Assignment: 4.
Grammar: Singular and Plural Nouns (2)
You will need the following information to complete questions three through five:
Singular nouns:
3. tooth
4. battery
5. wolf
Singular nouns:
3. tooth
4. battery
5. wolf
Assignment: 10. Project: Following Directions
IMPORTANT!! FOLLOW these directions: To make this project work like it should make sure you do not look at the lower part of the OW page or the OW box until AFTER you have read and completed these directions on paper.
PROJECT: FOLLOWING DIRECTIONS
Following directions is an important part of everyday life. Cooks follow directions on how to make foods so they will taste good. Drivers follow directions to be safe on the road. Knowing the directions and following them is an important part of being responsible.
Following directions can also be fun.
*Ask an adult to read the directions listed below to you.
*As you listen to the directions, draw a picture and practice following directions at the same time.
*Then read the directions to another person in your family (or class) to see if he can draw the picture.
Step 1: Get materials.
You will need a piece of paper, a pencil, an eraser, a ruler, and some crayons.
Step 2: Using the ruler and pencil lightly draw a straight line 4 inches long down the middle of your paper. You will erase this line later.
Step 3: Put a dot on the top of the line and a dot on the line every inch below the top one. Label the top dot lightly as 1. Put these dot numbers lightly so that they can be erased later.
Step 4: Now place your ruler on the second dot of your 4-inch line so that the line and ruler cross at the 3-inch mark on the ruler. Keep your ruler level.
Step 5: Keep your ruler at the 3-inch mark. Put dots at the 2½, 2¾, 3¼, and 3½ points on the ruler. Label these dots in order from right to left: 2, 3, 14 and 15.
Step 6: Place your ruler at the third dot on your line. Keep your ruler level and crossing at the 3-inch mark. Put dots at the 1½, 1¾, 4¼, and 4½ points on the ruler. Label these dots in order from right to left: 4, 5, 12 and 13.
Step 7: Move the ruler down to the fourth dot. Keep your ruler level and crossing at the 3-inch mark. Put dots at the ½, 2¾, 3¼, and 5½ points on the ruler. Label these dots in order from right to left: 6, 7, 10 and 11.
Step 8: Place your ruler at the bottom dot on your line. Keep your ruler level and crossing at the 3-unch mark. Put dots at the 2¾ and 3¼ points on the ruler. Label these dots in order from right to left: 8 and 9.
Step 9: Connect the dots in order from 1 to 15 and finish by connecting dot 15 to dot 1.
Step 10: Erase your 4-inch line and your dot numbers.
Step 11: Use your crayons to color your drawing.
IN THE OW BOX TYPE THE ANSWERS TO THE QUESTIONS LISTED BELOW.
NO PEEKING to see the picture until AFTER YOU HAVE FOLLOWED THE DIRECTIONS LISTED ABOVE AND DRAWN YOUR OWN PICTURE. :)
It will fun to compare to see how you did at following directions. It does take concentration. :)
After completing your drawing from the directions above take a look at the bottom of the OW page. What did your drawing look like? Did it look like the picture IN THE OW BOX? If not, look over the directions again and try to find your mistake. Try the drawing again.
ANSWERS the questions listed below by typing the info in the OW box.
THEN Take a PICTURE of your drawing and upload it to the OW file.
- What did your picture look like? Did it match the OW drawing?
- If it did not match the picture, which step did you not follow correctly?
- After you tried a second time, did your drawing come out right?
Assignment: 20. Essay: Writing a Friendly Letter
ESSAY: WRITING A FRIENDLY LETTER
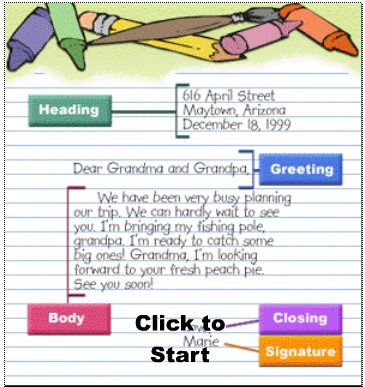
Go back to the lesson 19. Friendly Letters, and review each part of a friendly letter by clicking through the example like the one above. (Please do not skip this step!) Study each part and learn how to properly include it. Remember where to put capital letters and punctuation. Think about where each part of the letter is placed on the paper. Pay attention to margins, indentations, and spacing.
Type a letter of your own. You may write to your grandmother, grandfather, a friend, a school teacher, or someone else you know. Carefully include each part in the correct place on the page.
When you are finished, submit your letter to your teacher. You should save it and upload the file to the project page.
Ask your parents for permission to print and mail a copy of your letter to the person you wrote it to. :) You may want to redo it with your handwriting to make it more personal. You will make someone very happy with your friendly letter either way.
Project Advertisement and Forms: 21:
Read and follow the directions under the video clips. Be sure to read the directions before viewing. :)
Read and follow the directions under the video clips. Be sure to read the directions before viewing. :)
PROJECT ADVERTISEMENTS:
Look at these two recorded advertisements. Click the first video above (or click HERE) to watch it. Then click the second video above (or click HERE) to watch the other one. (Do not view or click on any of the other things that might pop up afterwards on the commercial as I do not have control on what might appear or might be on the other videos. I have only checked these two out.) :)
After viewing the two videos write at least two sentences about each advertisement making sure to explain the following:
1. What is the ad selling?
2. Tell how the writer tried to persuade, or make his audience (you) believe something about the product. How did writer try to convince you to buy the product?
3. Tell how the two ads differ.
